Platform Implementation Docs
Magento 2 Implementation Guide
Introduction
This step-by-step guide covers everything you need to implement Shopbox with Magento 2. Before we start, here are some key points to know:
Implementation and Staging
Generally it's best to get going with the Shopbox tracking script on production as soon as possible as this is the data we use to train the AI. We also prefer to do the training on the live data but can use staging data if needed but will be swapped out for the live data at some point as we don't keep track of both sets of data. This means that the shopbox product cards on the staging site will redirect to the live site. However, this is expected behaviour and does not cause issues for the functionality.
Cookie Policies
Shopbox stores basic information locally on devices. This information is cleared when the browser history is cleared. We do not track users across other sites, only on your domain, and we don’t collect any personally identifiable information (PII). This makes Shopbox a first-party essential cookie for normal site functions.
You can add this to your cookie policy if needed:
“We use local storage to enhance your shopping experience by remembering products your device has viewed, allowing us to show better recommendations. This data is not linked to personal information and is used solely within our store.”
Pre-implementation Checklist
Setup your payment plan here.
Send sign up confirmation to your onboarding manager.
You will receive an onboarding checklist from Shopbox to help keep track of what has been done as well as include links if you have signed up for additional modules.
Your onboarding manager will generate your client id for you before you get started with the implementation steps.
Your onboarding manager will give you access to our hub where you will be able to generate the API key you'll need for step 3.
Implementation breakdown
Step 1: Add Shopbox Tracking Components
Part 1 - Page detection
Add a class name to the BODY TAG for each of the following page types:
Homepage Example:
<body class="sb-homepage">...</body>
The Checkout Success is intended to be a hidden div element within the body of the page. The ID it contains should corrolate with the Order ID from the Magento API.
Part 2 - Tracking script
Insert our tracking script into the header of your site (both staging and production).
Your onboarding manager will have provided the required sbid (Shopbox ID).
Tracking Script Example:
<script>
    document.addEventListener('DOMContentLoaded', () => {
      var sbid = 'CUSTOMER_ID_GOES_HERE';
      var t = document.createElement("shopbox-app-v2"),
          s = document.createElement("script");
      t.setAttribute('cid', sbid);
      s.type = "text/javascript";
      s.async = true;
      s.src = "https://widget.shopbox.ai/js/app.js";
      document.body.appendChild(t);
      document.head.appendChild(s);
    });
</script>
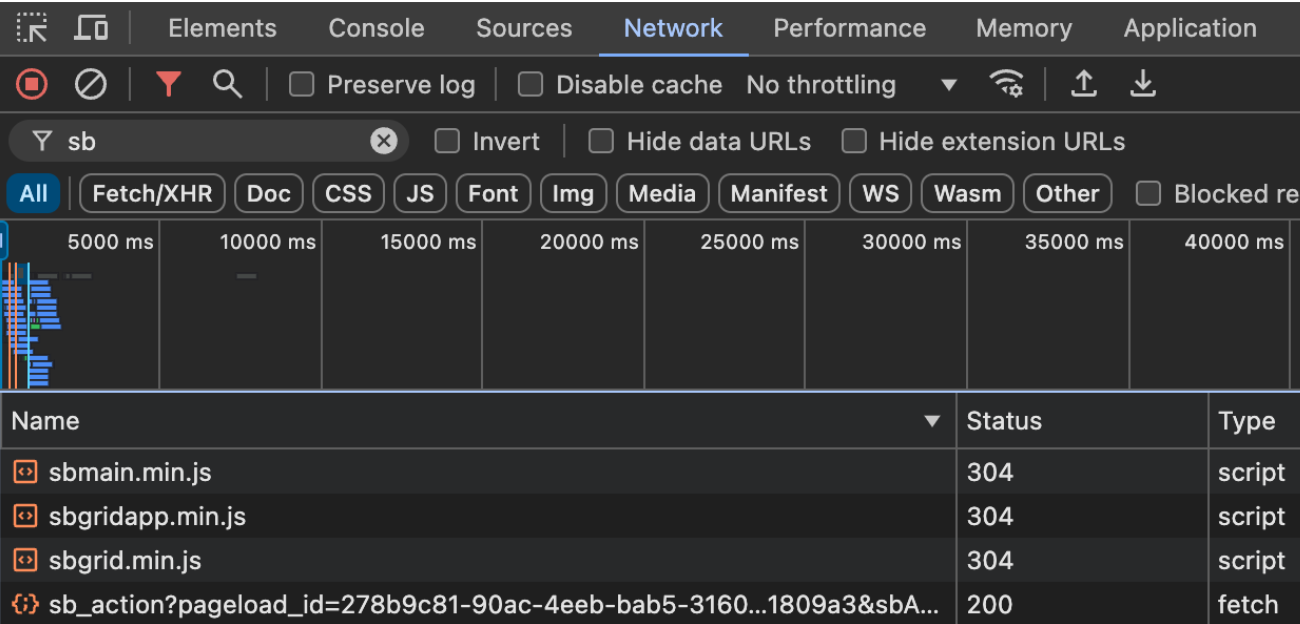
Testing Part 2:
If you inspect any page on your domain and check under the Network Tab you should be able to see the scripts indicated in the below screenshot. Please let us know if you have any failure status codes as there could be a reason our server is unable to contact your own domain.
Step 2: Set Up API Access to Magento
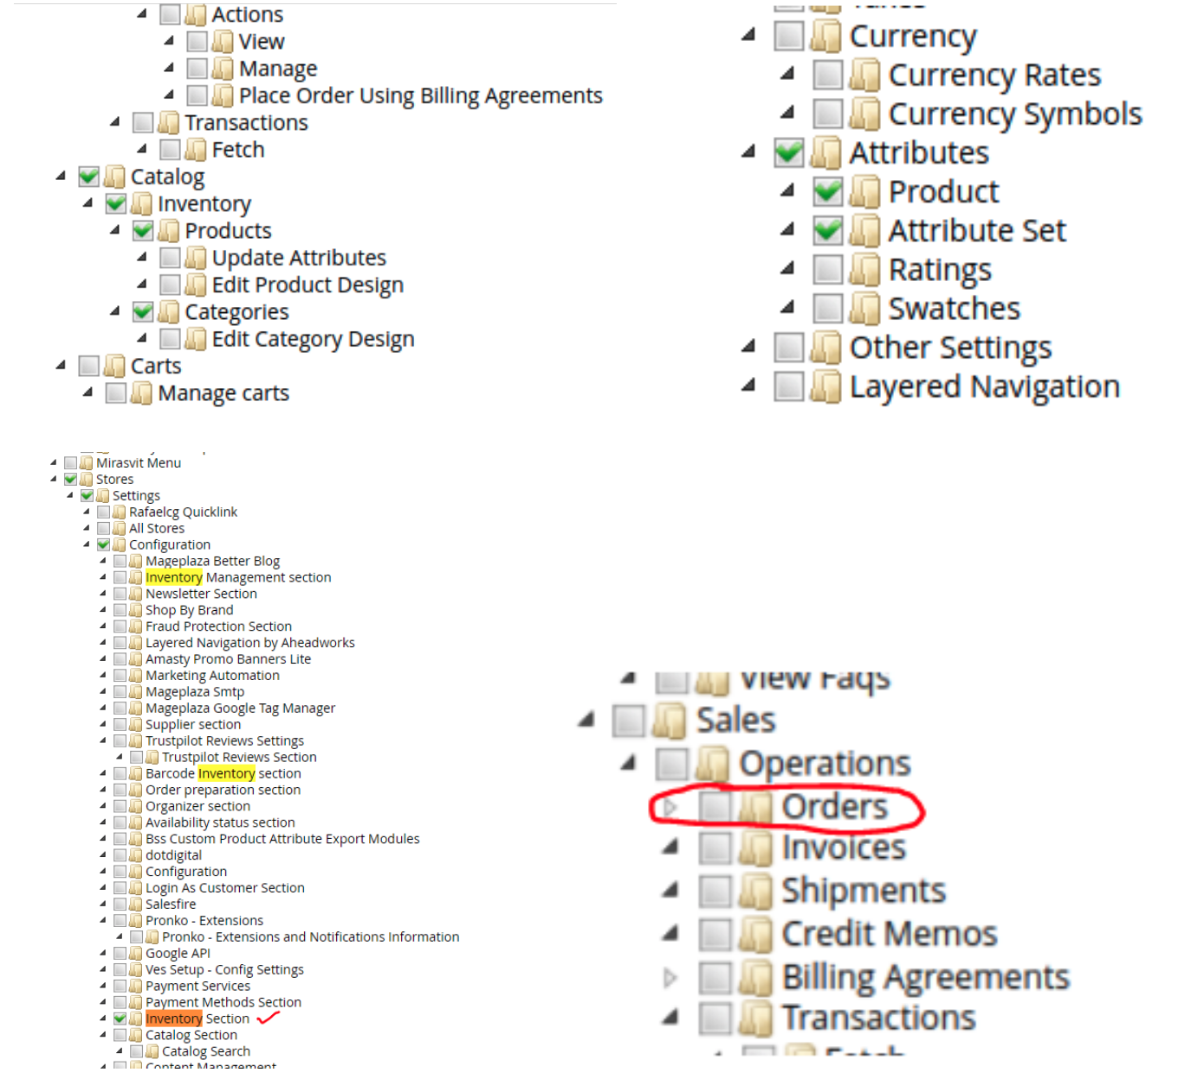
Grant read access to the following:
- Catalogue → Inventory → Products and Categories
- Attributes → Products and Attribute Sets
- Stores → Settings → Configuration → Inventory
- Orders → Read Access
Note to both validate and save the new account setup.
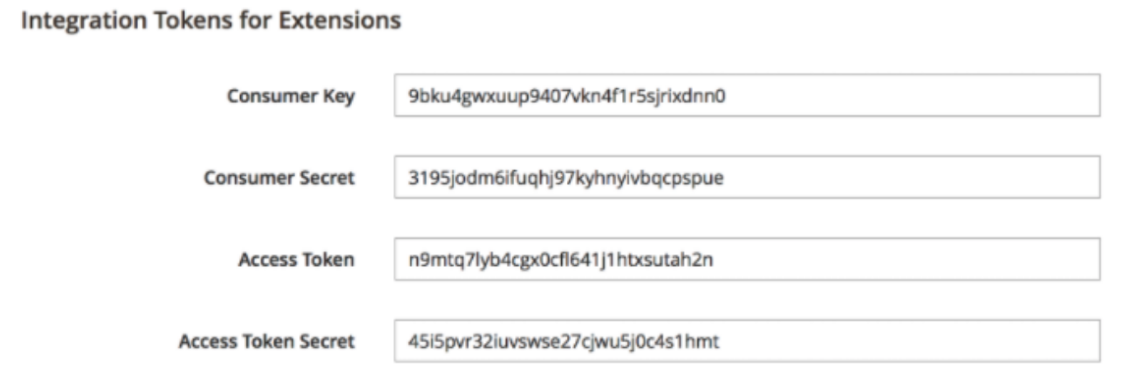
Once configured, send your API keys to your Shopbox Onboarding Manager, along with the Magento hostname and store ID.
Test API Access
Please note: You may need to allow our User-Agent to enable us to make API queries.
request_headers = {"User-Agent": "ShopboxFeed/1.0"}
Use the following queries to ensure proper API access through any security parameters. Replace INSERT_DOMAIN_HERE, ADD_TOKEN_HERE, and ADD_ID_HERE with your information.
Product Query Template:
curl --location --globoff 'https://INSERT_DOMAIN_HERE/rest/V1/products?searchCriteria[currentPage]=1&searchCriteria[filterGroups][0][filters][0][field]=status&searchCriteria[filterGroups][0][filters][0][conditionType]=%3D&searchCriteria[filterGroups][0][filters][0][value]=1&searchCriteria[filterGroups][1][filters][0][field]=visibility&searchCriteria[filterGroups][1][filters][0][conditionType]=%3D&searchCriteria[filterGroups][1][filters][0][value]=4&searchCriteria[pageSize]=10' \
--header 'Authorization: Bearer ADD_TOKEN_HERE' \
--header 'Cookie: PHPSESSID=ADD_ID_HERE'
Order Query Template:
curl --location --globoff 'https://INSERT_DOMAIN_HERE/rest/V1/orders?searchCriteria[currentPage]=1&searchCriteria[filterGroups][0][filters][0][field]=created_at&searchCriteria[filterGroups][0][filters][0][conditionType]=gt&searchCriteria[filterGroups][0][filters][0][value]=2021-03-02%2000%3A00%3A08&searchCriteria[pageSize]=10' \
--header 'Authorization: Bearer ADD_TOKEN_HERE' \
--header 'Cookie: PHPSESSID=ADD_ID_HERE'
Step 3: Align with your Shopbox onboarding manager
At this point, please be sure to align with your onboarding manager that steps 1 and 2 have been completed successfully. If everything is in order we will be able to build the AI model which should mature in over the period of a week before you continue to Step 4.
Step 4: Building Shopbox Components
Your onboarding manager will let you know once the modelling has been completed on our end. - It typically takes a week after steps 1 and 2 have been completed. Until then, our endpoints will return blank results.
Also, note that you will require an API Token to use our API endpoints. Please reach out to your onboarding manager if you are not able to generate your API key from our hub.
Part 1 - PDP Components
For the PDP we generally use the following endpoints. We generally recommend that the grids are added higher up on the page instead of too far down.
- Find similar - Title: You May also Like
- Recommendations - Title: Recommended for you
Here is an example of what could be expected:

Here is an example of how to build a Find Similar component powered by our API.
Please be sure to use the full product URLs from the Shopbox API response. The urls we return from the API contain additional parameters we use to track clicks on products we have recommended through the API. Please DO NOT STRIP THESE PARAMETERS. If so we will not be able to provide any information on attributes sales through the API.
Additionally if you use an add to cart option on your product cards, we ask you to review our analytics doc so we can keep track of products via the quick add.
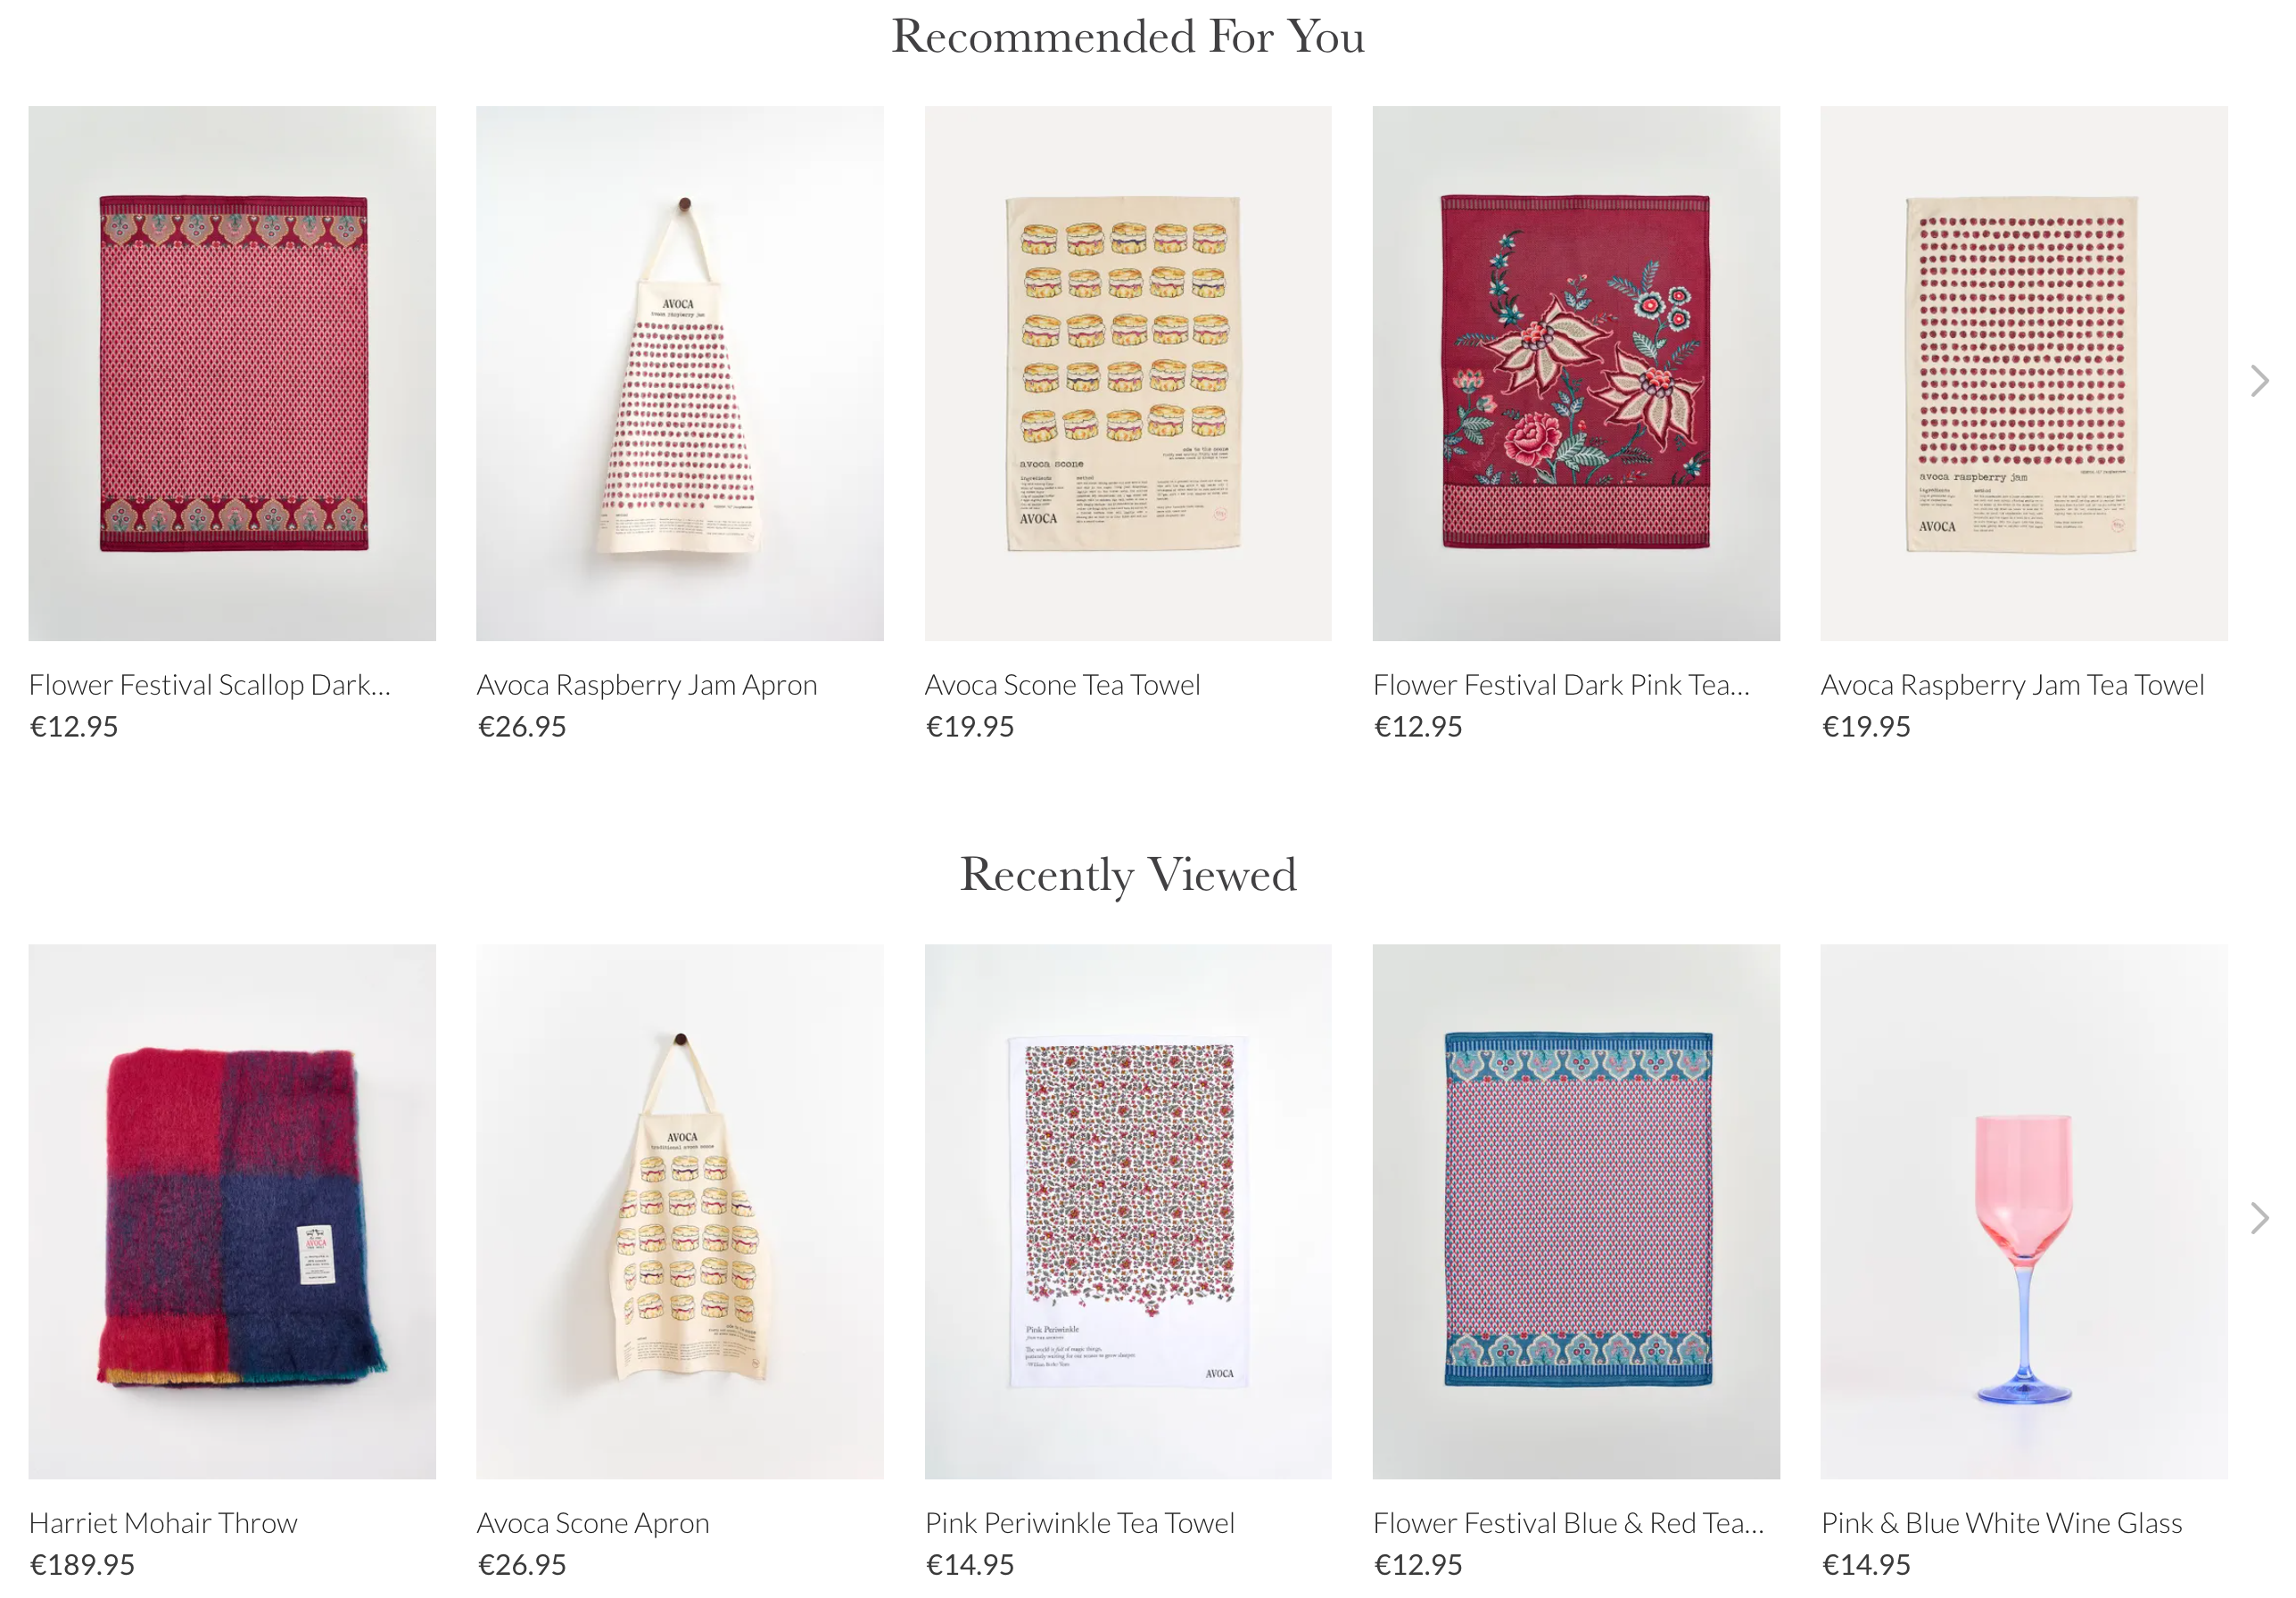
Part 2 - Homepage Components
For the Homepage we generally use the following endpoints. We generally recommend that this should appear right below the hero banner at the top of the homepage.
- Recommendations - Title: Recommended for you
- Recently Viewed - Title: You Recently Viewed
Here is an example of what could be expected:
Step 5: Requesting Support (Post implementation)
If you ever require any assistance with Shopbox please be sure to log a support ticket here.